SharePoint Designer 2013 Workflow Suspended with HTTP 400 exception

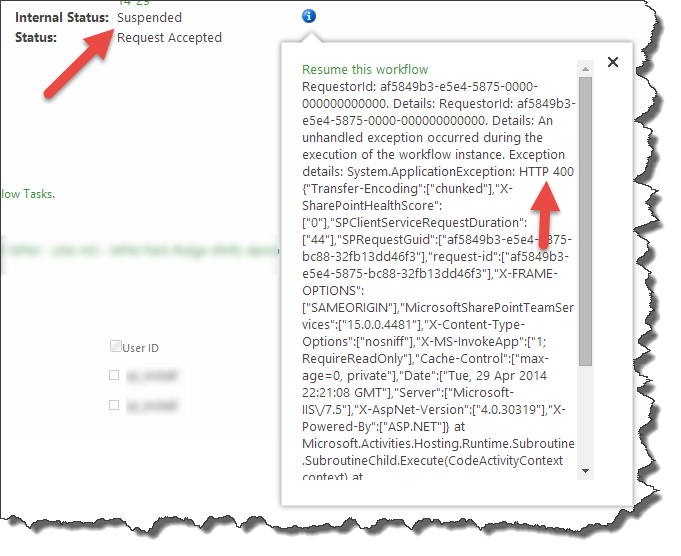
I have a SharePoint Designer 2013 workflow which sometimes ends up in a Suspended state with the following cryptic HTTP 400 error:

RequestorId: af5849b3-e5e4-5875-0000-000000000000. Details: RequestorId: af5849b3-e5e4-5875-0000-000000000000. Details: An unhandled exception occurred during the execution of the workflow instance. Exception details: System.ApplicationException: HTTP 400 {“Transfer-Encoding”:[“chunked”],”X-SharePointHealthScore”:[“0″],”SPClientServiceRequestDuration”:[“44″],”SPRequestGuid”:[“af5849b3-e5e4-5875-bc88-32fb13dd46f3″],”request-id”:[“af5849b3-e5e4-5875-bc88-32fb13dd46f3″],”X-FRAME-OPTIONS”:[“SAMEORIGIN”],”MicrosoftSharePointTeamServices”:[“15.0.0.4481″],”X-Content-Type-Options”:[“nosniff”],”X-MS-InvokeApp”:[“1; RequireReadOnly”],”Cache-Control”:[“max-age=0, private”],”Date”:[“Tue, 29 Apr 2014 22:21:08 GMT”],”Server”:[“Microsoft-IIS\/7.5″],”X-AspNet-Version”:[“4.0.30319″],”X-Powered-By”:[“ASP.NET”]} at Microsoft.Activities.Hosting.Runtime.Subroutine.SubroutineChild.Execute(CodeActivityContext context) at System.Activities.CodeActivity.InternalExecute(ActivityInstance instance, ActivityExecutor executor, BookmarkManager bookmarkManager) at System.Activities.Runtime.ActivityExecutor.ExecuteActivityWorkItem.ExecuteBody(ActivityExecutor executor, BookmarkManager bookmarkManager, Location resultLocation)

workflowemailerror01

I knew this was happening on a “Send an email” action in the workflow, but was having some trouble tracking down the issue and couldn’t find anything obviously wrong with the way things were setup.

After increasing the diagnostic logging levels I finally came across the following error in the ULS log:

Exception occured in scope Microsoft.SharePoint.Utilities.SPUtility.SendEmail. Exception=System.ArgumentException: The specified string is not in the form required for a subject.
at System.Net.Mail.Message.set_Subject(String value)
at Microsoft.SharePoint.Utilities.SPUtility.SendEmail_Client(EmailProperties properties)
at Microsoft.SharePoint.ServerStub.Utilities.SPUtilityServerStub.InvokeStaticMethod(String methodName, ClientValueCollection xmlargs, ProxyContext proxyContext, Boolean& isVoid)
at Microsoft.SharePoint.Client.ServerStub.InvokeStaticMethodWithMonitoredScope(String methodName, ClientValueCollection args, ProxyContext proxyContext, Boolean& isVoid)

The email being sent out used the customer name in the subject line.

workflowemailerror03

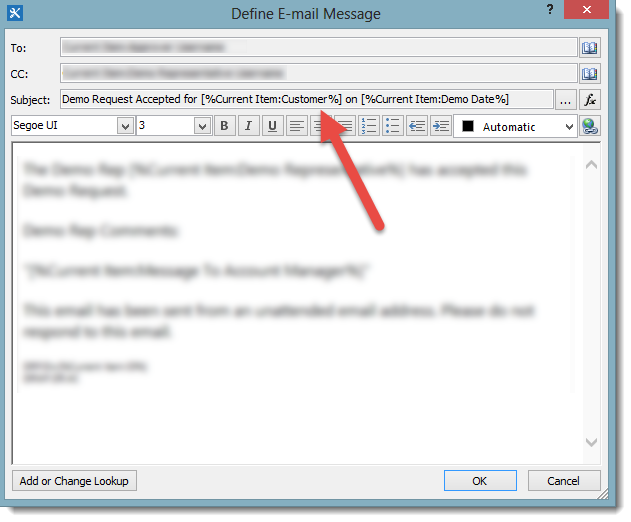
In this particular instance the customer name was coming from an InfoPath form and when I looked in the form I found a carriage return and line feed at the end of the customer name which was causing the error.

workflowemailerror02

I fixed the source data which was causing the problem, but I still had forms which included the bad data. I thought if I could strip out the carriage return and line feed in the workflow before sending the email that would solve my problem.

Unfortunately there is no built-in workflow actions to do this kind of string replacement with special characters. So I even went to the trouble of trying to create my own custom SharePoint 2103 workflow action to do this, thinking that it would be reusable.

workflowemailerror04

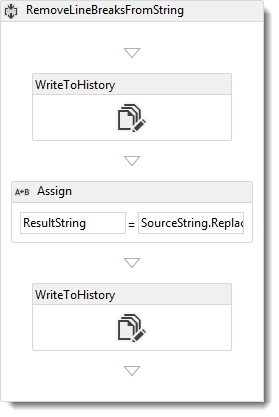
Setting ResultString to SourceString.Replace(“\r\n”, “”)

The custom action stubbornly refuses to work with escaped characters. I tried every variation of this I could imagine even using characters escaped for Regex expressions, as under the hood the workflow engine is using Regex to do the replacement. The custom action works beautifully if you use a regular string replacement like SourceString.Replace(“abc”, “”), but special characters it does not like. I finally gave up with this approach and fixed the bad data in the form before the workflow got fired.

List all alerts in a SharePoint farm

The PowerShell below allows you to list out in CSV format all the Alerts users have set on all lists in all sites, in all site collections, in all the web applications in a SharePoint Farm.

This script is a modification of the script at http://www.deliveron.com/blog/post/Find-all-Alerts-in-a-Site-Collection-in-SharePoint-2010.aspx by Jess Collicott which listed a site collection’s alerts.

####################################################################################################
#
#  Author.......: Khalid Ansari
#  Date.........: 07 Apr 2014
#  Description..: Output alerts set on all sites in all site collections in all web apps in the farm
#				  to a CSV file
#
####################################################################################################
Add-PSSnapin microsoft.sharepoint.powershell

$spAssignment = Start-SPAssignment

$webApps = Get-SPWebApplication -IncludeCentralAdministration
$alertResults = @()
foreach($webApp in $webApps)
{
    $webApp.url
	foreach ($site in $webApp.Sites) {
		$site.url
		foreach ($web in $site.AllWebs) {
			$web.url
			foreach ($alert in $web.Alerts){
				$alertResult = New-Object PSObject
				$alertResult | Add-Member -type NoteProperty -name "List URL" -value ($web.URL + "/" + $alert.ListUrl)
				$alertResult | Add-Member -type NoteProperty -name "Alert Title" -value $alert.Title
				$alertResult | Add-Member -type NoteProperty -name "Alert Type" -value $alert.AlertType
				$alertResult | Add-Member -type NoteProperty -name "Subscribed User" -value $alert.User
				$alertResults += $alertResult
			}
		}
	}
}
$alertResults

$alertResults | Export-CSV "FarmAlerts.csv"

Write-Host
Write-Host "Script Completed"
Stop-SPAssignment $spAssignment

The script will create a file called FarmAlerts.csv with a list of all the alerts.

Change SharePoint Management Shell default folder

I often pin the SharePoint Management Shell to the taskbar on SharePoint servers I am working on as shown below

spmgmtshellshortcut01

When I click on it I want it to open in a folder of my choice instead of the default, which is the users root folder.

Easy enough, but unfortunately you can’t just change the “Start in:” folder on the shortcut. You must change the “Target:” value instead. Every time I go to change the shortcut I mess it up because of the somewhat complicated target string.

I will show you how to change this target string to do what we want. First right-click on your taskbar shortcut, then right-click on the “SharePoint 2013 Management Shell” menu item, then click on propertiesspmgmtshellshortcut02

You will get the following dialog box:spmgmtshellshortcut03

Your “Target:” value should look like:

C:\Windows\System32\WindowsPowerShell\v1.0\PowerShell.exe -NoExit  ” & ‘ C:\Program Files\Common Files\Microsoft Shared\Web Server Extensions\15\CONFIG\POWERSHELL\Registration\\sharepoint.ps1′”

Edit this value and add the folder you want to open in as shown below

C:\Windows\System32\WindowsPowerShell\v1.0\PowerShell.exe -NoExit  ” & ‘ C:\Program Files\Common Files\Microsoft Shared\Web Server Extensions\15\CONFIG\POWERSHELL\Registration\\sharepoint.ps1’; cd D:\SharePoint\Scripts

Note that the new command goes between the last single and double quote of the original string.

Since all we are doing here is adding a PowerShell command, you could technically add any other commands you wanted or even run a script if you want.

Your shortcut will now open in the default folder of your choice

spmgmtshellshortcut04

Visual Studio 2012 SharePoint .csproj Unsupported

I have run into this a few times now and I keep forgetting how to fix it, so it is time to document the solution.

PROBLEM

I install Visual Studio 2012 on a machine, connect to TFS and get latest on some SharePoint projects. I open the SharePoint project and get the following error message:

“These projects are either not supported or need project behavior impacting modifications to open in this version of Visual Studio. Projects not displayed either require no changes or will automatically be modified such that behavior is not impacted.

Unsupported
This version of Visual Studio does not have the following project types installed or does not support them. You can still open these projects in the version of Visual Studio in which they were originally created. For details, see More information.”

unsupportedproject01

And my first reaction is What do you mean you don’t support .csproj files. Those files were invented for you. If you don’t recognize them who will?

So then I the scour the Interweb come up with a bunch of useless suggestions about how I should run Devenv.exe /ResetSkipPkgs or better still uninstall Visual Studio, turn off the computer, wait 30 seconds, turn it on again, install Visual Studio, etc.

The solution shown below is simpler and doesn’t harm any humans in the process.

SOLUTION

The solution to this madness is to install the Office Developer Tools for Visual Studio 2012.

Open up the Web Platform Installer and if you don’t have it installed download and install it. Search for Office Developer Tools and install it.

unsupportedproject02

For some reason I never remember to do this, now if I can just remember that I wrote this article I won’t waste another hour of my life.

Delete the Merge Documents and Relink Documents views on a forms library

I recently came across a situation where I needed to remove the “Merge Documents” and “Relink Documents” views on a forms library so that the users wouldn’t hurt themselves.

deletemergeview01

I think the “Merge Documents” link is created because of the setting shown below in InfoPath Form Options although I have not verified this.

deletemergeview02

These views do not show up in the Views section at the bottom of the Library Settings so there is no easy way to delete them. I checked in SharePoint Manager 2013 and could see the views but not delete them for some reason even though I had permissions.

So I wrote the following PowerShell script to delete the views.

####################################################################################################
#
#  Author.......: Khalid Ansari
#  Date.........: 08 Nov 2013
#  Description..: Delete Merge and Relink views on a SharePoint list
#  Parameters...: [Required] SiteUrl = Url of site
#				  [Required] ListDisplayName = Display name of list
#
####################################################################################################
param(
	[parameter(Mandatory=$true)] [string] $SiteUrl
	, [parameter(Mandatory=$true)] [string] $ListDisplayName
)

function DeleteView([object] $list, [string] $viewName)
{
	$view = $list.Views[$viewName]
	if ($view)
	{
		Write-Host "Found view $($view.Title). Deleting view..."
		$list.Views.Delete($view.ID)
		$list.Update()
		$view = $list.Views[$viewName]
		if (!$view)
		{
			Write-Host "View deleted"
		}
	}
	else
	{
		Write-Host "View $($viewName) not found"
	}
}

$spAssignment = Start-SPAssignment

$web = Get-SPWeb $SiteUrl
$list = $web.Lists[$ListDisplayName]

DeleteView $list "Merge Documents"
DeleteView $list "Relink Documents"

$web.Dispose()

Stop-SPAssignment $spAssignment

You could argue that they should not be deleted because they have some useful reason for being there and that is entirely possible, but in this instance I needed to zap them since merging of the InfoPath documents would have caused havoc with the clients business process and life is too short to spend time explaining relinking to an end user.

AutoSPInstaller – SharePoint Installation & Configuration Made Simple

I have completely abandoned installing and doing initial SharePoint configuration the old-fashioned hard way using a lethal mix of installers, Central Admin, PowerShell and an easily distracted mind.

I now use AutoSPInstaller from CodePlex to make all my SharePoint installation and configuration tasks a breeze. OK that is a lie because using AutoSPInstaller is also very hard as it requires you to painstakingly hand code an unforgiving XML configuration file using an IntelliSenseless tool such as Notepad.

autospinstaller02

Fortunately for us Ivan Josipovic found the time to create AutoSPInstallerGUI which makes creating the AutoSPInstaller XML files a walk in the park. Thanks Ivan!

autospinstaller03

AutoSPInstaller is a set of PowerShell scripts which use the XML configuration file to install all the SharePoint components including Service Packs, Cumulative Updates etc. The scripts will then setup the managed accounts, create and configure all the service applications, search topology, user profile synchronization, web applications, site collections and bunch of other configurations typically done on a new farm such as IIS, ULS and usage log settings, object cache accounts, email settings, etc.

Plus it sets up all the SharePoint databases using sensible naming conventions. No crazy GUID database names. It shocked me too. Crazy idea not having a GUID in the name, but somehow it works. Clearly these AutoSPInstaller guys are not destined for jobs at Microsoft.

autospinstaller01

It also allows you to do remote parallel installation and configuration of all the servers in a farm. Actually this is where AutoSPInstaller and I had a fight. Unfortunately documentation for the tool is well non-existent really. The community has put together some documentation but none of it explains how to use AutoSPInstaller to configure multiple servers in a farm. I struggled with this for quite and while and then realized I was wasting more time to get this to work then it would take me to manually configure the additional servers. This is not something I have had the time to figure out, but despite this problem AutoSPInstaller has been a huge time saver in setting up servers in a consistent manner.

Once you have created a configuration file for a farm it is easy to reuse this for other similar farms or for different environments; production, staging, QA. The configuration file can safely be re-run multiple times to fix issues or rebuild parts of the farm you may have removed. For instance you can delete a web application, site collection or a service application and re-run the script to recreate it. I also find that the configuration file acts as documentation of everything done to setup and configure a farm.

AutoSPInstaller and AutoSPInstallerGUI are huge time savers and are now part of my essential SharePoint toolkit.

SharePoint Branding Examples

Have you ever had a customer say they don’t want SharePoint to look like SharePoint and you want to show them that it doesn’t have to look like SharePoint. When this happens I often show them a few public SharePoint sites that show them what can be done with branding SharePoint. My favourite is ferrari.com. Ferrari has been using SharePoint for their site since Microsoft Office SharePoint Server 2007.

spexamples01

But if you are looking for a site more in tune with your customers business you may want to look at one of the following sites for inspiration.

Top SharePoint Internet Sites

http://www.spsdemo.com/livepivot

This site use Microsoft’s live pivot viewer and if are like me and attracted to bright shiny objects that waste your time this is a great way to view a bunch of SharePoint sites and filter by industry, country, platform, etc. and just click things to watch the pretty little images rearrange themselves on the page.

spexamples02

Top SharePoint Sites

http://www.topsharepoint.com

This site also has lots of examples of SharePoint branding. The site is too cluttered for my liking, but it is fairly easy to find relevant sites by using the Search box on the right of the page.

spexamples03

Configure SharePoint outgoing email to use an SMTP server which does not listen on port 25

You just found out that the SMTP server that your SharePoint server needs to configure in the Outgoing E-Mail Settings does not listen on port 25.

The bad news is that SharePoint does not allow you to configure this. It always connects to port 25 because only the foolhardy would use an alternate port.

The good news is the steps to get around this using the SMTP service installed on to the SharePoint server have been documented by David Lozzi at Sending SharePoint emails through alternate ports

If you are using Exchange Online as your SMTP server to send emails you can follow the instructions at Step by step configuration of Outgoing Emails from SharePoint to Microsoft Online

Verify SharePoint outgoing e-mail settings using Telnet

If you have configured your outgoing email settings but are having issues sending emails from SharePoint verify that your SMTP server is allowing connections from your SharePoint server using Telnet.

If your SharePoint server does not have the Telnet Client installed you can install this from the Server Manager > Add Roles and Features wizard in Windows Server 2012. The Telnet Client is in the features list.

telnetclient01

Eric Lough has a detailed article Troubleshooting SharePoint SMTP Errors via Telnet which describes the telnet commands to use.

If the issue turns out to be Exchange Server not allowing your SharePoint server to relay emails and you can’t find the Exchange server guru in your organization or you are the Exchange Server “guru” in your organization follow George Khalil’s instructions at Configuring outgoing email in SharePoint 2010 with Exchange 2010 – Step by Step Guide to get you out of that mess.

Migrate from classic-mode to claims-based authentication in SharePoint 2013 the easy way

When migrating a content database from a SharePoint 2010 web application using classic-mode authentication to a SharePoint 2013 web application using claims-based authentication Microsoft recommends converting the web application and all its content databases to claims-based authentication in SharePoint 2010 first and then migrating the web application and all its content databases over to SharePoint 2013. See Migrate from classic-mode to claims-based authentication in SharePoint 2013 for all the painful details.

That is a laborious way to do it, because it implies the following process:

  1. Recreate the web application and all its content databases in a Test farm
  2. Convert the web application to claims-based authentication in the Test farm (unless you feel this is something you want to do in your Production farm just to keep your job interesting).
  3. Detach the database(s) from the SharePoint 2010 Test farm’s SQL Server, copy them over to the SharePoint 2013 Production farm’s SQL Server and attach them
  4. Run Mount-SPContentDatabase etc.

If you are the kind of person who craves this kind of excitement in their lives stop reading now because you will be disappointed by the simplicity of the process described below.

The quick and easy way to do the above:

  1. Detach the database(s) from the SharePoint 2010 Production farm’s SQL Server, copy them over to the SharePoint 2013 Production farm’s SQL Server and attach them
  2. Run Mount-SPContentDatabase etc.
  3. Run the PowerShell below to convert the content database(s) to claims-based authentication
$wa = Get-SPWebApplication http://www.mydomain.com
$acc = 'DOMAIN\SP_Farm'
$arguments = New-Object Microsoft.SharePoint.Administration.SPWebApplication+SPMigrateUserParameters
$arguments.AddDatabaseToMigrate($wa.ContentDatabases[0])
# The line above only adds the first content database in
# the web application for demonstration purposes. You may
# need to iterate through your databases and add them all.
$wa.MigrateUsersToClaims($acc, $false, $arguments)

The second easier method above gives you the same results as the first laborious process but with considerably less pain.

Thanks to Steve Peschka for providing the PowerShell commands above and Chris Weldon for making the PowerShell commands behave in a civilized manner. A couple of points to note from their blog posts, first do not change the name of the parameter “$arguments” to anything else as this causes problems. Second, if you use the SharePoint farm account as I did above then make sure the second parameter to the MigrateUsersToClaims method is set to $false.

For migrations Microsoft always talks about Detach/Attach for migrating databases but I prefer Backup/Restore, but that is something I will discuss in more detail in another post.