Login prompt accessing list on SharePoint site with anonymous access enabled

PROBLEM

You have a SharePoint Publishing site with anonymous access enabled. Users are able to get to most of the pages and document libraries that you have exposed via anonymous access, but you have one or more lists which stubbornly prompt the user to login.

This problem also commonly occurs on anonymous access Blog sites living under a Publishing site where users are prompted to login to post comments. That is because comments are stored in a SharePoint list and this problem is related to SharePoint lists exposed to anonymous users.

SOLUTION

Many solutions to this problem suggest disabling the Site Collection feature ViewFormPagesLockdown as this is enabled by default on Publishing sites. This is a bad idea as it exposes various pages such as /layouts/viewlsts.aspx, more commonly known as Site Contents, that you do not want to give anonymous users access to. ViewFormPagesLockdown on an anonymous site is a good thing, but it does cause us grief with lists we want to expose anonymously.

I have created a PowerShell script below that enables anonymous access on a list living under a publishing site without having to resort to disabling the ViewFormPagesLockdown feature.

####################################################################################################
#
#  Author.......: Khalid Ansari
#  Date.........: 17 Jan 2014
#  Description..: Allow anonymous access to a list in a publishing site
#                 For details of the problem this script solves go to http://wp.me/p3Cf9P-aL
#  Parameters...: [Required] SiteUrl = Url of site (not site collection, unless they are the same)
#                 [Required] ListDisplayName = Display name of list
#
####################################################################################################
param(
    [parameter(Mandatory=$true)] [string] $SiteUrl
    , [parameter(Mandatory=$true)] [string] $ListDisplayName
)

$spAssignment = Start-SPAssignment

$web = Get-SPWeb $SiteUrl -ErrorAction Stop
Write-Host -f Green "Found site $($web.Title)"
$list = $web.Lists[$ListDisplayName]
if ($list) {
	Write-Host -f Green "Found list $($list.Title)"

	$list.BreakRoleInheritance($true, $false)
	$list.AllowEveryoneViewItems = $true
	Write-Host -f Yellow "Existing permissions: $($list.AnonymousPermMask64)"
	$list.AnonymousPermMask64 = "ViewPages, OpenItems, ViewVersions, Open, UseClientIntegration, ViewFormPages, ViewListItems";
	$list.Update();
	Write-Host -f Yellow "Updated permissions.: $($list.AnonymousPermMask64)"
	Write-Host -f Green "Anonymous access enabled on list"
}
else {
	Write-Host -f Red "List $($ListDisplayName) not found"
}

$web.Dispose()
Write-Host
Write-Host "Script Completed"
Stop-SPAssignment $spAssignment

Running the script above results in output similar to that shown below:

listanonaccess01

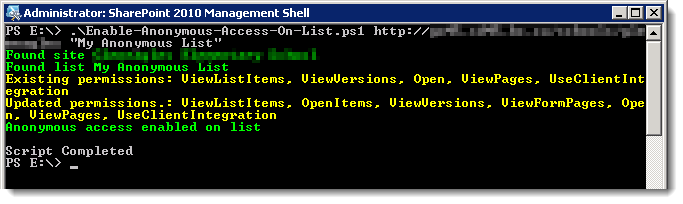
Note that in order to enable these permissions it is necessary for the script to break permission inheritance on the list. After running the above script your list should be accessible anonymously and you didn’t have to disable the ViewFormPagesLockdown feature.

Delete the Merge Documents and Relink Documents views on a forms library

I recently came across a situation where I needed to remove the “Merge Documents” and “Relink Documents” views on a forms library so that the users wouldn’t hurt themselves.

deletemergeview01

I think the “Merge Documents” link is created because of the setting shown below in InfoPath Form Options although I have not verified this.

deletemergeview02

These views do not show up in the Views section at the bottom of the Library Settings so there is no easy way to delete them. I checked in SharePoint Manager 2013 and could see the views but not delete them for some reason even though I had permissions.

So I wrote the following PowerShell script to delete the views.

####################################################################################################
#
#  Author.......: Khalid Ansari
#  Date.........: 08 Nov 2013
#  Description..: Delete Merge and Relink views on a SharePoint list
#  Parameters...: [Required] SiteUrl = Url of site
#				  [Required] ListDisplayName = Display name of list
#
####################################################################################################
param(
	[parameter(Mandatory=$true)] [string] $SiteUrl
	, [parameter(Mandatory=$true)] [string] $ListDisplayName
)

function DeleteView([object] $list, [string] $viewName)
{
	$view = $list.Views[$viewName]
	if ($view)
	{
		Write-Host "Found view $($view.Title). Deleting view..."
		$list.Views.Delete($view.ID)
		$list.Update()
		$view = $list.Views[$viewName]
		if (!$view)
		{
			Write-Host "View deleted"
		}
	}
	else
	{
		Write-Host "View $($viewName) not found"
	}
}

$spAssignment = Start-SPAssignment

$web = Get-SPWeb $SiteUrl
$list = $web.Lists[$ListDisplayName]

DeleteView $list "Merge Documents"
DeleteView $list "Relink Documents"

$web.Dispose()

Stop-SPAssignment $spAssignment

You could argue that they should not be deleted because they have some useful reason for being there and that is entirely possible, but in this instance I needed to zap them since merging of the InfoPath documents would have caused havoc with the clients business process and life is too short to spend time explaining relinking to an end user.

AutoSPInstaller – SharePoint Installation & Configuration Made Simple

I have completely abandoned installing and doing initial SharePoint configuration the old-fashioned hard way using a lethal mix of installers, Central Admin, PowerShell and an easily distracted mind.

I now use AutoSPInstaller from CodePlex to make all my SharePoint installation and configuration tasks a breeze. OK that is a lie because using AutoSPInstaller is also very hard as it requires you to painstakingly hand code an unforgiving XML configuration file using an IntelliSenseless tool such as Notepad.

autospinstaller02

Fortunately for us Ivan Josipovic found the time to create AutoSPInstallerGUI which makes creating the AutoSPInstaller XML files a walk in the park. Thanks Ivan!

autospinstaller03

AutoSPInstaller is a set of PowerShell scripts which use the XML configuration file to install all the SharePoint components including Service Packs, Cumulative Updates etc. The scripts will then setup the managed accounts, create and configure all the service applications, search topology, user profile synchronization, web applications, site collections and bunch of other configurations typically done on a new farm such as IIS, ULS and usage log settings, object cache accounts, email settings, etc.

Plus it sets up all the SharePoint databases using sensible naming conventions. No crazy GUID database names. It shocked me too. Crazy idea not having a GUID in the name, but somehow it works. Clearly these AutoSPInstaller guys are not destined for jobs at Microsoft.

autospinstaller01

It also allows you to do remote parallel installation and configuration of all the servers in a farm. Actually this is where AutoSPInstaller and I had a fight. Unfortunately documentation for the tool is well non-existent really. The community has put together some documentation but none of it explains how to use AutoSPInstaller to configure multiple servers in a farm. I struggled with this for quite and while and then realized I was wasting more time to get this to work then it would take me to manually configure the additional servers. This is not something I have had the time to figure out, but despite this problem AutoSPInstaller has been a huge time saver in setting up servers in a consistent manner.

Once you have created a configuration file for a farm it is easy to reuse this for other similar farms or for different environments; production, staging, QA. The configuration file can safely be re-run multiple times to fix issues or rebuild parts of the farm you may have removed. For instance you can delete a web application, site collection or a service application and re-run the script to recreate it. I also find that the configuration file acts as documentation of everything done to setup and configure a farm.

AutoSPInstaller and AutoSPInstallerGUI are huge time savers and are now part of my essential SharePoint toolkit.

SharePoint Branding Examples

Have you ever had a customer say they don’t want SharePoint to look like SharePoint and you want to show them that it doesn’t have to look like SharePoint. When this happens I often show them a few public SharePoint sites that show them what can be done with branding SharePoint. My favourite is ferrari.com. Ferrari has been using SharePoint for their site since Microsoft Office SharePoint Server 2007.

spexamples01

But if you are looking for a site more in tune with your customers business you may want to look at one of the following sites for inspiration.

Top SharePoint Internet Sites

http://www.spsdemo.com/livepivot

This site use Microsoft’s live pivot viewer and if are like me and attracted to bright shiny objects that waste your time this is a great way to view a bunch of SharePoint sites and filter by industry, country, platform, etc. and just click things to watch the pretty little images rearrange themselves on the page.

spexamples02

Top SharePoint Sites

http://www.topsharepoint.com

This site also has lots of examples of SharePoint branding. The site is too cluttered for my liking, but it is fairly easy to find relevant sites by using the Search box on the right of the page.

spexamples03

Configure SharePoint outgoing email to use an SMTP server which does not listen on port 25

You just found out that the SMTP server that your SharePoint server needs to configure in the Outgoing E-Mail Settings does not listen on port 25.

The bad news is that SharePoint does not allow you to configure this. It always connects to port 25 because only the foolhardy would use an alternate port.

The good news is the steps to get around this using the SMTP service installed on to the SharePoint server have been documented by David Lozzi at Sending SharePoint emails through alternate ports

If you are using Exchange Online as your SMTP server to send emails you can follow the instructions at Step by step configuration of Outgoing Emails from SharePoint to Microsoft Online

Verify SharePoint outgoing e-mail settings using Telnet

If you have configured your outgoing email settings but are having issues sending emails from SharePoint verify that your SMTP server is allowing connections from your SharePoint server using Telnet.

If your SharePoint server does not have the Telnet Client installed you can install this from the Server Manager > Add Roles and Features wizard in Windows Server 2012. The Telnet Client is in the features list.

telnetclient01

Eric Lough has a detailed article Troubleshooting SharePoint SMTP Errors via Telnet which describes the telnet commands to use.

If the issue turns out to be Exchange Server not allowing your SharePoint server to relay emails and you can’t find the Exchange server guru in your organization or you are the Exchange Server “guru” in your organization follow George Khalil’s instructions at Configuring outgoing email in SharePoint 2010 with Exchange 2010 – Step by Step Guide to get you out of that mess.

Migrate from classic-mode to claims-based authentication in SharePoint 2013 the easy way

When migrating a content database from a SharePoint 2010 web application using classic-mode authentication to a SharePoint 2013 web application using claims-based authentication Microsoft recommends converting the web application and all its content databases to claims-based authentication in SharePoint 2010 first and then migrating the web application and all its content databases over to SharePoint 2013. See Migrate from classic-mode to claims-based authentication in SharePoint 2013 for all the painful details.

That is a laborious way to do it, because it implies the following process:

  1. Recreate the web application and all its content databases in a Test farm
  2. Convert the web application to claims-based authentication in the Test farm (unless you feel this is something you want to do in your Production farm just to keep your job interesting).
  3. Detach the database(s) from the SharePoint 2010 Test farm’s SQL Server, copy them over to the SharePoint 2013 Production farm’s SQL Server and attach them
  4. Run Mount-SPContentDatabase etc.

If you are the kind of person who craves this kind of excitement in their lives stop reading now because you will be disappointed by the simplicity of the process described below.

The quick and easy way to do the above:

  1. Detach the database(s) from the SharePoint 2010 Production farm’s SQL Server, copy them over to the SharePoint 2013 Production farm’s SQL Server and attach them
  2. Run Mount-SPContentDatabase etc.
  3. Run the PowerShell below to convert the content database(s) to claims-based authentication
$wa = Get-SPWebApplication http://www.mydomain.com
$acc = 'DOMAIN\SP_Farm'
$arguments = New-Object Microsoft.SharePoint.Administration.SPWebApplication+SPMigrateUserParameters
$arguments.AddDatabaseToMigrate($wa.ContentDatabases[0])
# The line above only adds the first content database in
# the web application for demonstration purposes. You may
# need to iterate through your databases and add them all.
$wa.MigrateUsersToClaims($acc, $false, $arguments)

The second easier method above gives you the same results as the first laborious process but with considerably less pain.

Thanks to Steve Peschka for providing the PowerShell commands above and Chris Weldon for making the PowerShell commands behave in a civilized manner. A couple of points to note from their blog posts, first do not change the name of the parameter “$arguments” to anything else as this causes problems. Second, if you use the SharePoint farm account as I did above then make sure the second parameter to the MigrateUsersToClaims method is set to $false.

For migrations Microsoft always talks about Detach/Attach for migrating databases but I prefer Backup/Restore, but that is something I will discuss in more detail in another post.

Save time in SharePoint Central Administration

Here are a couple of things I like to do in the SharePoint Central Administration site which claw back a few seconds of my life so that I have time to write blog posts.

First, after every Cumulative Update applied to the farm I go to the Site Settings > Look and Feel > Title, description, and logo and change the description of the site to include the current patch level and build number

centraladmin02

centraladmin03

I always know which version the farm is patched to and it saves me from having to look up Todd Klindt’s SharePoint 2013 Build Numbers to figure out that 15.0.4505.1005 is Apr 2013 CU.

Second, I add links to the Resources section on the right to frequently used pages. That way I can go there with one click instead of having to hunt through the Service Applications list.

centraladmin01

I know these are simple things, but I am always surprised by how many clicks SharePoint administrators are willing to go through to get where they want. Maybe they think it is a penance they have to pay for using SharePoint. Forgive yourself and as a bonus conserve energy by reducing your click count 😉

SharePoint minimum hardware requirements increase hard disk size

Every SharePoint environment I come across has the following Health Analyzer warning about drives running out of free space:

Title

Drives are at risk of running out of free space.

Severity

2 – Warning

Category

Availability

Explanation

Available drive space is less than five times the value of physical memory. This is dangerous because it does not provide enough room for a full memory dump with continued operation. It also could cause problems with the Virtual Memory swap file: (SERVERNAME – C:).

Remedy

Examine the failing servers and delete old logs or free space on the drives. For more information about this rule, see “http://go.microsoft.com/fwlink/?LinkID=142688“.

Failing Servers

SERVERNAME

Failing Services

SPTimerService (SPTimerV4)

Rule Settings

View


This happens because without fail every customer is told to setup their server’s system hard drive as an 80 GB drive.
Microsoft recommends it and we know they are always spot on with their advice 😉

So why do we get the warning? Well let’s assume we are running a server with 16 GB of memory. 5 x 16 GB = 80 GB so we should be good, except the warning says we need 80 GB of available space. Last time I checked the operating system needed more than zero bytes, a heck of a lot more.

So let’s stop telling our customers that they need an 80 GB drive and start telling them they need a 160 GB drive which seems much more realistic, even for a server with 24 GB of RAM. When was the last time you skimped on the RAM or CPU cores? Never, but when it comes to the lowly hard drive 80 GB is plenty. NO IT IS NOT! Size matters. You have been warned [repeatedly].